How To Go In Excel Next Sheet


How to go to the next line in excel, how to go down a line in excel, how to go incognito mode, how to go into bios windows 10, how to go back to windows 10 from windows 11, how to go live on youtube, how to go from windows 11 to 10, how to recall an email in outlook, how to clear cache, how to clear cache in edge,

There's no denying the fact that Excel is one of the most widely used programs for data management and analysis across different industries. Whether you're a business analyst, accountant, or educator, knowing how to use Excel effectively can make a significant difference in how efficiently you perform your day-to-day tasks. In this blog post, we'll dive into a powerful Excel feature – VLOOKUP – and explore how it can help you automate data retrieval processes and save valuable time.

VLOOKUP: The Basics

Before we get into the nitty-gritty details, let's start with the basics. What is VLOOKUP, and how does it work? VLOOKUP is a built-in Excel function that allows you to retrieve information from a specific cell in a table based on another value in the same row. This value is known as the "lookup value," and it's typically entered manually or referenced from another cell. Once you've specified the lookup value and the table range, VLOOKUP scans the first column of the table for a matching value and returns the value in the cell of the same row as the matched value in the specified column.

For example, let's say you have a table that lists the sales figures for different products in different regions. The table contains the product names in the first column and the sales figures for each region in the second, third, and fourth columns. If you want to find out the sales figures for a particular product in a particular region, you can use VLOOKUP to look up the product name in the first column and return the corresponding sales figure in the specified column.

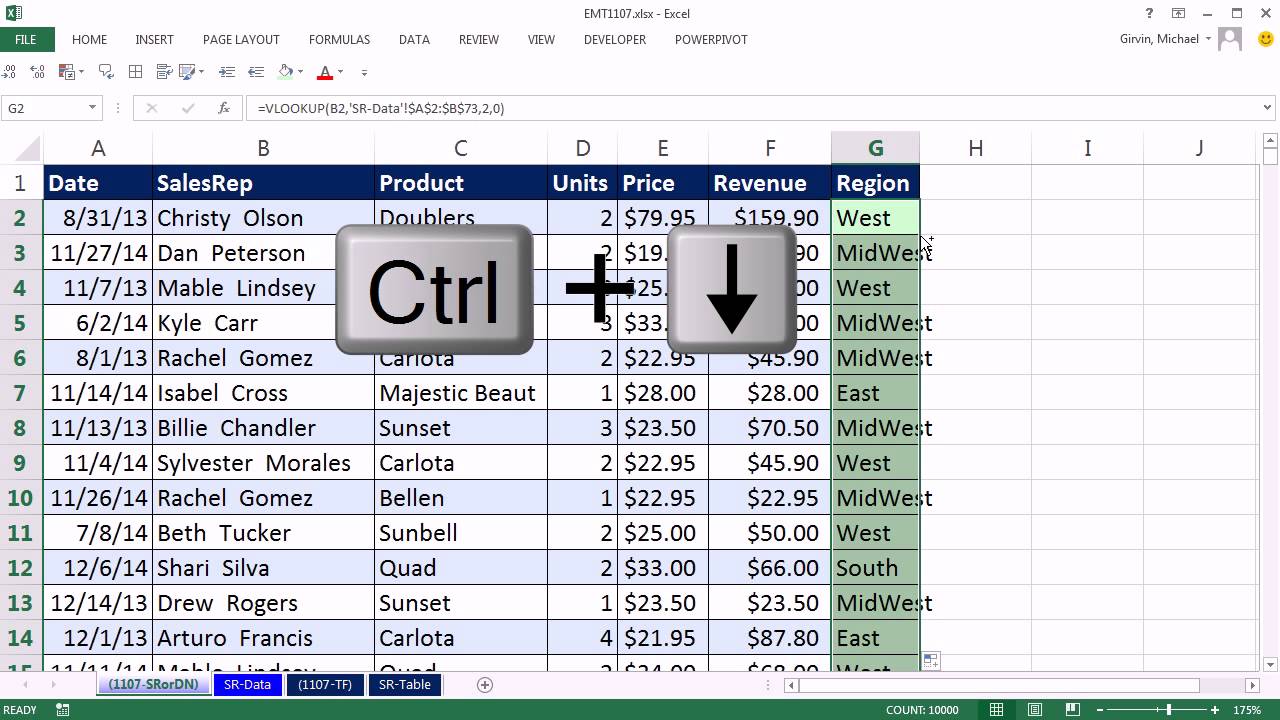
VLOOKUP: Sheet References

VLOOKUP is incredibly versatile and can be used in a variety of different ways to make your work easier and more efficient. One of the most useful features of VLOOKUP is its ability to reference data on different sheets.

When you're working with large datasets, it's not uncommon to have data spread across multiple sheets. For example, you might have one sheet for customer records, another for sales figures, and a third for product information. To retrieve data from different sheets, you can use VLOOKUP in combination with a sheet reference.

To reference data from a different sheet, you need to specify the sheet name in the table range argument of the VLOOKUP function. For example, if you have a sheet named "Sales" and a table named "Products" containing sales figures for different products, you can use the following formula to retrieve the sales figure for a particular product:

=VLOOKUP(A1,Sales!Products,2,FALSE)

In this formula, "A1" refers to the cell containing the lookup value, "Sales" refers to the name of the sheet containing the data, "Products" refers to the name of the table containing the data, "2" refers to the column number (which contains the sales figures), and "FALSE" specifies that an exact match is required.

VLOOKUP: Advanced Techniques

While the basic functionality of VLOOKUP is helpful in many situations, there are also several advanced techniques you can use to make VLOOKUP even more powerful.

For example, if you want to return a range of values rather than a single value, you can use the INDEX and MATCH functions in combination with VLOOKUP to produce a more flexible and dynamic lookup formula.

You can also use VLOOKUP with conditional formatting to highlight cells or entire rows that meet certain criteria. Conditional formatting allows you to apply formatting (such as colors or icons) to cells based on specific rules or formulas. By using VLOOKUP to define the rules for conditional formatting, you can quickly and easily spot trends or anomalies in your data.

Another advanced technique is to use VLOOKUP in conjunction with other Excel functions, such as IF, SUMIF, AVERAGEIF, and COUNTIF. These functions allow you to perform more complex calculations and analysis on your data, such as summing the sales figures for a particular product or calculating the average sales figures for a particular region.

Conclusion

VLOOKUP is a powerful and versatile Excel function that can help you retrieve, analyze, and manipulate data more efficiently. By mastering the basics of VLOOKUP and exploring some of the more advanced techniques, you can become a more proficient and productive Excel user. Whether you're looking to streamline your data retrieval processes, automate complex calculations, or analyze large datasets, VLOOKUP is an essential tool in any Excel user's toolbox.


Also read:

.

How To Make Rich Zobo


How to make rich chocolate cake, how to make rich brown gravy, how to make google my search engine, how to make buttermilk, how to make hard boiled eggs, how to make money from home, how to draw, how to lower blood pressure, how to get free robux,

Looking for a refreshing and healthy drink? How about trying the famous African drink known as "zobo"?

The Uncommon Terminology of Zobo

Zobo, also known as hibiscus tea, is a drink made from the flowers of the hibiscus plant, scientifically known as Hibiscus sabdariffa. This plant is native to Africa and is commonly grown in tropical regions such as Nigeria, where it is known by its popular name, "zobo."

Aside from its delightful name, zobo has many other nicknames. It is referred to as "sobolo" in Ghana, "bissap" in Senegal, and "karkade" in Egypt. Regardless of its name, zobo is a popular beverage enjoyed by many people all over the world.

The Health Benefits of Zobo

Zobo is more than just a tasty drink. It is also known for its health benefits. Zobo is loaded with antioxidants, which are substances that protect your cells from damage caused by free radicals. Drinking zobo can help lower blood pressure, reduce cholesterol levels, and fight inflammation. Zobo's high vitamin C content also helps boost the immune system, keeping you healthy all year round.

The Easy Way to Make Zobo Drink

Are you ready to try making zobo drink at home? Here's an easy recipe:

  1. Wash one cup of dried hibiscus flowers, also known as zobo leaves, and add them to a pot with six cups of water.
  2. Bring to a boil over medium-high heat, then reduce the heat and let it simmer for 15-20 minutes.
  3. Remove from heat and let cool completely. Strain the mixture and add sugar or honey to taste.
  4. Serve with ice and enjoy!

Zobo: A Versatile Drink

One of the things that makes zobo so unique is its versatility. You can enjoy zobo in many different ways. Some people prefer it hot, like a traditional tea, while others enjoy it cold over ice. You can add your favorite fruits such as oranges and pineapples to give it a tangy twist or ginger and cloves for a spicy kick. Zobo is even used as a base for cocktails, making it the perfect drink for any occasion.

Conclusion

Zobo is a refreshing and healthy drink that is easy to make at home. With its unique taste and health benefits, it's no wonder why it has become so popular all over the world. So the next time you're looking for a delicious and nutritious drink, give zobo a try!


Also read:

.

How To Change My Twitter Name On Iphone


How to change my twitter name on my phone, how to i change my twitter name, how to change my twitter password, how to change my twitter email, how to change my twitter picture, how to change my default search engine, how to change yahoo to google, how to change password, how to change id, how to draw, how to get free robux, how to delete facebook account,

Twitter has become a household name in the world of social media. With the recent surge of users, it's no surprise that many people are curious about how to change their name display and identifier on the platform. In this article, we'll go over the details of how to change your name display and identifier on Twitter, from the simple steps to the more technical aspects.

What is a Twitter Display Name?

First things first, let's define what a Twitter display name is. Your Twitter display name is the name that appears on your profile and in your tweets. It's also the name that people will see when they search for you. When you sign up for Twitter, your username becomes your display name by default. However, you can change it to anything you desire at any time.

How to Change Your Twitter Display Name

If you're looking to change your Twitter display name, follow these simple steps:

  1. Open Twitter and log in to your account
  2. Click on the Profile icon in the top right corner of the screen
  3. Select Settings and privacy from the drop-down menu
  4. Click on the Account tab
  5. Under the Username section, type in your desired display name
  6. Click the Save Changes button at the bottom of the screen

It's that easy! Your Twitter display name will now be updated to your desired name. However, keep in mind that there are a few restrictions when it comes to choosing your display name. It must be fewer than 50 characters, not contain any symbols or spaces, and not be in use by another Twitter user.

What is a Twitter Identifier?

You may have heard the term "Twitter identifier" before, but what exactly does it mean? Your Twitter identifier, also known as your Twitter handle or username, is the unique name that identifies your Twitter account. It's the name people will tag you with, and it's also the name that appears in your Twitter URL. For example, if your Twitter handle is @example, your Twitter URL will be twitter.com/example.

How to Change Your Twitter Identifier

Changing your Twitter identifier is a bit more complicated than changing your display name. It can be done, but you need to be careful not to lose any of your followers in the process. Here's how to do it:

  1. Log in to your Twitter account and click on the Profile icon in the top right corner of the screen
  2. Click on Settings and privacy from the drop-down menu
  3. Click on the Account tab
  4. Under the Username section, type in your desired username
  5. Check the availability of your desired username by clicking the Check availability button
  6. If your desired username is available, click the Save Changes button at the bottom of the screen
  7. If your desired username is not available, try again with a different username

When you change your Twitter identifier, your previous username will become available for anyone else to claim. If someone else decides to take your previous username, your followers will be directed to their account instead of yours. It's important to let your followers know that you've changed your username so they don't get confused.

Conclusion

Twitter is a powerful platform that allows you to communicate your thoughts and ideas to the world. Knowing how to change your display name and identifier on the platform can be a big help in establishing your online presence. With the simple steps we've provided, you'll be able to change your Twitter name display and identifier in no time, whether you're looking to rebrand your business or simply update your personal profile.

Remember to choose a display name and identifier that represents you best, whether you're a business or an individual. It's important to keep it professional, as your Twitter name and identifier can be a deciding factor for people to follow you or not. Happy tweeting!


Also read:

.

How To Enable Disabled Macros In Excel


How to open excel with macros disabled, how to enable disabled macros in excel, how to enable disabled apps, how to enable disabled link on desktop, how to enable disabled add in outlook, how to enable voice chat in roblox, how to enable 2fa, how to get help in windows,

If you've ever worked with spreadsheets, you know that they can be time-consuming and monotonous. However, there is a solution that can help you automate your work and save time - macros.

What are Macros?

Macros are a series of commands and actions that can be recorded and played back in Excel. Essentially, macros automate tasks in Excel that you would normally have to do manually.

Once you record a macro in Excel, you can execute it with the click of a button or a keyboard shortcut. This can help you save time and minimize errors by automating repetitive tasks and calculations.

Enabling Macros in Excel

Before you can use macros in Excel, you need to enable them. Here's how:

  1. Open Excel and click on the "File" tab.
  2. Click on "Options" in the left-hand menu.
  3. Select "Trust Center" in the left-hand menu.
  4. Click on the "Trust Center Settings" button.
  5. Select "Macro Settings" in the left-hand menu.
  6. Select the radio button next to "Enable all macros" or "Enable macros for digitally signed worksheets" depending on your security preferences.
  7. Click "OK" to save your changes.

Recording a Macro in Excel

Once you have enabled macros, you can start recording your first macro. Here's how:

  1. Open a new or existing workbook in Excel.
  2. Click on the "View" tab and select "Macros" in the far-right corner.
  3. Select "Record Macro" from the dropdown menu.
  4. Give your macro a name that is easy to remember.
  5. Select the location where you want to store the macro.
  6. Click "OK" to start recording.
  7. Perform the actions that you want to automate with the macro.
  8. Click the "Stop Recording" button when you are finished.

Your macro is now ready to be used.

Playing Back a Macro in Excel

Once you have recorded a macro, you can play it back with the click of a button or a keyboard shortcut. Here's how:

  1. Open the workbook that contains the macro.
  2. Click on the "View" tab and select "Macros" in the far-right corner.
  3. Select the macro that you want to run.
  4. Click the "Run" button or use the keyboard shortcut that you specified when you recorded the macro.

Your macro will now execute the actions that you recorded.

Conclusion

Macros are a powerful tool that can help you automate your work in Excel. By enabling macros and recording your own macros, you can save time and reduce errors in your spreadsheet work. So, next time you find yourself repeating the same actions in Excel, consider recording a macro to automate the task.

Now that you know how to enable macros and automate your work on a spreadsheet, you can improve your productivity and efficiency in Excel.


Also read:

.

Where Is Text Box In Google Docs


Where is text box in google docs, how to add a text box in google docs, where is text box in open office, where is text box in word, where is text box in paint, where is text box tools, where is text box in pdf, where is text box in adobe, where is text box in google docs, where is text effect in word, where is text group in word,

If you're a professional who loves working with Google Docs, you've probably faced situations where you needed to add a text box to your document. While it might seem like a challenge, the truth is that adding a text box to Google Docs is a breeze.

Method 1: Using 'Insert Drawing'

The first method for adding a text box to your Google Doc is by using the 'Insert Drawing' feature. To get started with this method, follow these steps:

  1. Open Google Docs and create a new document
  2. From the 'Insert' tab on the menu bar, select 'Drawing'
  3. In the drawing window, select the 'Text Box' option from the 'Shape' icon
  4. Click and drag your cursor across the drawing canvas to create your text box
  5. After you've created your text box, simply type in it as you would with any other text box
  6. Save your drawing and it will automatically be added to your Google Doc as an individual element

Using 'Insert Drawing' to add a text box to your document is easy, and it makes sure that your text box remains perfectly in place and doesn't interfere with any other elements of your document.

Method 2: Using the 'Table' Feature

An alternative way of adding a text box to your Google Docs is by using the 'Table' feature. Here's how:

  1. Open a new Google Doc and place the cursor where you want to insert the text box
  2. Select the 'Table' option from the menu bar
  3. From the dropdown menu, select the number of rows and columns for your table
  4. Click 'Insert' to add the table to your document
  5. Select the cell where you want to add your text box
  6. Use the 'Merge cells' option from the table menu to merge the selected cell with any adjacent cell
  7. Your cell will now have expanded to the size of the merged cells, allowing you to type and add formatting as desired

Using tables to create text boxes is an incredibly versatile method, as you can customize the table's size, colors, and style to match the rest of your document's design. Additionally, as with drawings, tables ensure that your text box remains confined within specified boundaries so that it won't shift or move around.

Method 3: Using 'Insert Shape'

Lastly, another method of adding a text box to your Google Doc is by using the 'Insert Shape' feature. Here's how:

  1. Open your Google Doc and place your cursor where you want to add your text box
  2. From the 'Insert' menu, select the 'Drawing' option
  3. From here, click on the 'Shape' icon and select the 'Rectangle' option
  4. After you click 'Rectangle', drag the cursor over the document to create the text box. You can size up and design the box as you like
  5. Type text into the box once it appears on your document
  6. Click 'Save and Close' to finalize your design

Using the 'Insert Shape' method adds a more visually appealing element to your text box. Since you can customize the text box's size, shape, and color, this method is a great way to create unique designs or highlight specific content in your document.

Conclusion:

Adding a text box to your Google Doc is an essential tool for conveying important information or making your document more visually appealing. Whether you prefer using 'Insert Drawing,' 'Table,' or 'Insert Shape' to create your text box, once you've got the hang of it, you'll be adding text boxes to your documents like a pro in no time.

Now that you know how to add text boxes to your Google Doc, get creative and design customized documents like never before! These methods will change the way you approach document creation, making it more enjoyable and aesthetically pleasing than ever.

Text boxes in google docs??? youtube. Docs text box google insert icon into menu click. 4 ways to insert a text box in google docs. Text box google insert docs. Getintopc introduction. Getintopc download free your desired app. Docs google text boxes

If you are looking for How to add a text box in google docs youtube, you've came to the right web. We have pics like How to insert a text box in google docs solveyourdocuments, how to add a text box in google docs [faq], how to add text box in google docs? candid.technology. Here it is:

How to add a text box in google docs [faq], how to make a text box google docs cloudshareinfo


Also read:

.

How To Insert Checkbox In Excel App


How to insert checkbox in excel sheet, how to insert checkbox in word document, how to insert checkbox in pages, how to insert checkbox in excel, how to insert a tampon, how to insert image in html, how to draw,

If you're a frequent user of Microsoft Excel, you may have experienced the need for checkboxes in your spreadsheets. Whether you're tracking tasks, creating forms, or just organizing information, checkboxes can be a helpful tool. In this article, we'll guide you through the process of inserting checkboxes in Excel, step by step.

Step 1: Enable Developer Tab

The first step to inserting checkboxes in Excel is to enable the Developer tab. This tab is not displayed by default, so you'll need to enable it manually. To do this, follow the steps below:

  1. Click on the File tab in the top left corner of the Excel window.
  2. Click on Options at the bottom of the menu on the left side of the screen.
  3. In the Excel Options window, click on Customize Ribbon in the menu on the left side of the screen.
  4. Check the box next to Developer in the list of Main Tabs on the right side of the screen.
  5. Click OK to save your changes.

Step 2: Insert the Checkbox Control

Once you've enabled the Developer tab, you're ready to insert the checkbox control into your spreadsheet. Follow these steps:

  1. Click on the Developer tab in the top menu of the Excel window.
  2. Click on the Insert button in the Controls group.
  3. In the list of Form Controls, click on the checkbox icon (it looks like a square with a check mark inside).
  4. Click and drag your mouse to draw the checkbox on your spreadsheet.

Step 3: Customize the Checkbox

Now that you've inserted the checkbox control, you can customize it to suit your needs. Here are some of the options you may want to adjust:

  • Checkbox Name: Double click on the checkbox control to open the Properties window. In the Name field, you can give your checkbox a custom name to help you keep track of it. This is especially helpful if you plan to use multiple checkboxes in your spreadsheet.
  • Checkbox Label: To add a label next to your checkbox, click on the Design Mode button in the Controls group of the Developer tab. Right-click on the checkbox and select Edit Text. Type your label text and press Enter.
  • Checkbox Value: By default, the checkbox will be set to "TRUE" when checked and "FALSE" when unchecked. If you want to use a different value, double-click on the checkbox control to open the Properties window. In the Value field, enter the text you want to use as the checkbox value.

Step 4: Link Checkbox to Cell

Now that your checkbox is customized, you need to link it to an Excel cell so you can use the checkbox value in formulas and calculations. Here's how:

  1. With the Design Mode button still selected in the Developer tab, right-click on the checkbox control and select Format Control.
  2. In the Format Control window, go to the Control tab.
  3. In the Cell link field, enter the cell reference where you want to store the checkbox value. This can be any empty cell in your spreadsheet.
  4. Click OK to close the Format Control window.
  5. Click on the Design Mode button again to exit Design Mode and return to normal Excel view.

Step 5: Test the Checkbox

Now that you've linked the checkbox to an Excel cell, it's time to test it out. Check the box and verify that the cell you linked it to displays the correct value. Then uncheck the box and verify that the cell value updates correctly. If everything looks good, you're ready to start using checkboxes in your Excel spreadsheets!

Overall, checkboxes can be a great tool for simplifying your Excel workflow and making your spreadsheets more user-friendly. By following these simple steps, you can quickly and easily add checkboxes to your own spreadsheets. So why not give it a try and see how much time and effort you can save?


Also read:

.

How To Get Rich Netflix Amani Instagram


How to get rich netflix amani instagram video, how to get rich netflix amani instagram story, how to get rich netflix amani oruwariye, how to get rich netflix amani battle, how to get rich fast, how to get rich soil in dreamlight valley, how to get rid of yahoo on google chrome, how to get rid of bed bugs, how to download youtube videos,

The journey to becoming wealthy is one that requires patience and resilience. While many have the desire to achieve financial freedom, it's often a difficult path to navigate. The road to wealth may not always be smooth, but it's important to never give up. This is just one of the many lessons that entrepreneurs learn along the way.

Building Wealth through Entrepreneurship

Many people believe that entrepreneurship is the key to creating wealth. While becoming an entrepreneur can be an incredibly rewarding experience, it's important to remember that it's not a guaranteed path to riches. In fact, many new businesses fail within the first few years.

However, for those who are willing to put in the work and take risks, entrepreneurship can be one of the most lucrative career paths. When starting a business, it's important to have a solid plan in place. This includes researching the market, identifying potential customers and creating a unique value proposition that differentiates your product or service from others in the industry.

The Importance of Investing

Once you've established a successful business, it's important to make smart financial decisions. One of the best ways to build wealth over time is through investing. This allows your money to grow while you focus on other aspects of your life.

There are many different types of investments to consider, such as stocks, mutual funds, real estate and commodities. It's important to carefully research each option and determine which one aligns with your investment goals and risk tolerance.

It's also important to diversify your portfolio to spread out your risk. This means investing in a variety of different assets rather than putting all your money into one type of investment. This minimizes the potential for one bad investment to wipe out your entire portfolio.

The Power of Compound Interest

One of the most powerful tools in building wealth is compound interest. This is when your money earns interest on interest, which can significantly increase your wealth over time. The earlier you start investing, the more time your money has to grow through the power of compound interest.

For example, if you were to invest $10,000 at a 7% annual return, your money would double in value in just over 10 years. If you were to leave that money invested for 20 years, it would quadruple in value.

The Role of Personal Finance Management

In addition to entrepreneurship and investing, it's important to manage your personal finances in a responsible way. This includes creating a budget, minimizing debt and saving for emergencies.

Creating a budget is a critical first step in managing your finances. This allows you to see where your money is going and identify areas where you can cut back on expenses. This also makes it easier to prioritize your spending and ensure that you're putting your money towards things that truly matter to you.

Minimizing Debt

Debt can be a major obstacle in building wealth, as it creates a constant burden on your finances. It's important to minimize debt as much as possible and avoid high-interest loans.

One way to do this is by paying off credit card debt as soon as possible. This allows you to avoid accruing high interest charges and frees up more money to put towards savings and investments.

Saving for Emergencies

Finally, it's important to build an emergency fund to cover unexpected expenses or periods of financial hardship. This fund should ideally cover at least six months of expenses and should be held in a safe, easily accessible account.

In conclusion, building wealth is a journey that requires patience, resilience and careful planning. Whether through entrepreneurship, investing or personal finance management, there are many paths to achieving financial freedom. By staying focused and making smart financial decisions, anyone can work towards building a successful and rewarding life.


Also read:

.

Recover Photos On Iphone


How to recover deleted photos on iphone, recover photos on iphone, recover photos online, recover photos on icloud, recover photos on google, recover photos on ipad, recover photos from iphone, recover photoshop file after crash, recover photos android, recover photos from broken android phone,

Have you ever accidentally deleted that priceless photo of your dog dressed up in a tutu? Or maybe you just had too much fun at the bar and woke up with a missing phone? Well, fear no more! There are not one, not two, not three, but four ways to recover deleted photos from your trusty iPhone.

Option 1: The Old Reliable iTunes Backup

First up, we have the good ol' iTunes backup. If you regularly synced your iPhone to your computer via iTunes, it's likely you have a backup saved that contains the deleted photos. Simply plug your phone into your computer, open up iTunes, and click on "Restore Backup" to recover not only your photos, but any other data that may have been lost.

Option 2: The iCloud Savior

If you're more of a cloud-based person, you can utilize iCloud to recover deleted photos. Log in to iCloud.com with your Apple ID, and click on "Photos". From there, click on "Recently Deleted" to search for any deleted photos within the past 30 days. Simply select the photo(s) you wish to recover and hit "Restore". Voila!

Option 3: Dr. Fone's Miracle Cure

For those who want a third party solution, Dr. Fone's iPhone Data Recovery software may be just what the doctor ordered. This software can be downloaded onto your computer, and once connected to your iPhone, can scan for and recover any deleted photos. Plus, with a name like "Dr. Fone", you know you're getting quality care.

Option 4: iOS Photo Recovery for the Win

Last but not least, we have iOS Photo Recovery - a handy software that can quickly recover deleted photos from your iPhone. With a user-friendly interface and efficient scanning process, iOS Photo Recovery can bring those precious memories back to life. Trust us, you'll feel like a winner.

So there you have it, folks. Four unique ways to recover your deleted iPhone photos. Whether you opt for the straightforward iTunes backup or try out a third-party software, one thing is for sure: you'll never have to say goodbye to that adorable photo of your furry friend again.

How can i recover permanently deleted photos from iphone?. Iphone data recover backup without recovery lost part. Iphone,ipad,ipod touch data recovery iphone photo recoveryrecover. Recover iphone syncios. Selecting messages plugging initiate. 4 ways to recover photos in iphone. How to recover deleted messages on iphone tech genesis

If you are searching about How to recover iphone lost data, you've came to the right web. We have images like How can i recover permanently deleted photos from iphone?, how to recover deleted messages on iphone tech genesis, 4 ways how to recover deleted photos from iphone. Here you go:

How to recover iphone lost data, how to recover deleted photos/pictures from iphone 7/6s/6


Also read:

.

Search This Blog

close